Create a GIN repository for your dataset#
GIN (hosted by the German Neuroinformatics Node) is a free and open data management system designed for neuroscientific data.
It is web-accessible, based on git and git-annex, and allows you to keep your data in sync, backed up and easily accessible.
Below we explain the main user workflows in GIN.
Preparatory steps - do only once#
We need to do these steps only the first time we use GIN’s command-line interface (CLI) on our machine.
Create a GIN account.
Download GIN CLI and set it up by running:
$ gin login
You will be prompted for your GIN username and password.
Confirm that everything is working properly by typing:
$ gin --version
Create a GIN repository#
To create a local and a remote GIN repository, follow these steps:
Log in to the GIN server
Before running any
gincommands, make sure you are logged in to your account by running:$ gin login
Tip
In Unix-like systems (Ubuntu, MacOS), you may need sudo permissions for some of the following gin commands. If so, remember to prepend all commands with sudo.
Initialise a GIN repository
Create a new GIN repository locally and on the GIN server:
$ gin create <repository-name>
This will create a repository called
<repository-name>on the GIN server under your user account, and a directory with the same name in the current working directory.OR alternatively:
Create a repository in the GIN server from the browser, and clone (retrieve) it to your local workspace:
$ gin get <username>/<remote-repository-name>
Next, move or copy files to the newly created directory to add data to the local GIN repository.
Move to the relevant directory using
cd.Create a new repository on the GIN server and locally in the current working directory:
$ gin create --here <repository-name>
This will create a repository named
<repository-name>on the GIN server under your user account and link it to the current working directory.OR alternatively:
Initialise the current working directory as a GIN repository:
$ gin init
Add a remote:
$ gin add-remote <remote-name> <remote-repository-location>
where
<remote-name>is the name you want to give to the remote (e.g.origin) and<remote-repository-location>is the location of the data store, which should be in the form of alias:path or server:path (e.g.gin:<username>/<remote-repository-name>).If the remote GIN repository doesn’t exist, you will be prompted to either create it, add simply the remote address, or abort.
Note
Initialising the GIN local repository (with gin create or gin init) will create a hidden .git directory under the local repository directory. The local repository excluding this .git folder is what we will later call the working directory.
Add files to the GIN remote repository
It is good practice to keep a record of the changes in the repository through commit messages. To keep a useful and clean commit history, it is also recommended to make small commits by selecting a subset of the files.
To add a record of the current state of a local repository, run:
$ gin commit --message <message> <filename>
You can replace the
<filename>above by an expression with a wildcard (e.g.,*.pngto include all png files). It can also be a list of files separated by whitespaces. A<filename>equal to.will include all files with changes. See the full syntax forgin commithere.To upload all local changes to the remote GIN repository, run:
$ gin upload <filename>
<filename>accepts the same inputs as ingin commit. You can run an upload command after a few commits (so not necessarily after every commit).You can use the flag
--to <remote-name>to upload the changes to a specific remote. To show the remotes accessible to your GIN account, rungin remotes. See the full syntax forgin uploadhere.If the set of files in the
gin uploadcommand includes files that have been changed locally but have not been committed, they will be automatically committed when uploading.After running
gin upload, the data will be uploaded to the GIN server and it will be possible to retrieve it later from there. However, notice the upload command sends all changes made in the directory to the GIN server, including deletions, renames, etc. Therefore, if you delete files from the directory on your computer and perform agin upload, the file will be removed from the server as well. Such changes can be synchronized by simply runninggit upload(i.e., without specifying any files). See further details in the GIN docs.
Consider whether to lock the data
You may want to lock the data to save space locally or to prevent editing in the future — see the section on File locking for further details.
Tip
Use
gin lsto check on the current status of the GIN repository (if your are familiar withgit, is is somewhat equivalent togit status). The file status acronyms used in the output are described here.Use
gin syncto sync the changes bi-directionally between the local and the remote GIN repository.If the output from
gin lsdoesn’t look right (e.g., files already uploaded to the GIN server appear underLocally modified (unsaved)), try runninggin syncand check the status again.To logout from the GIN CLI session in the terminal, run
gin logout.
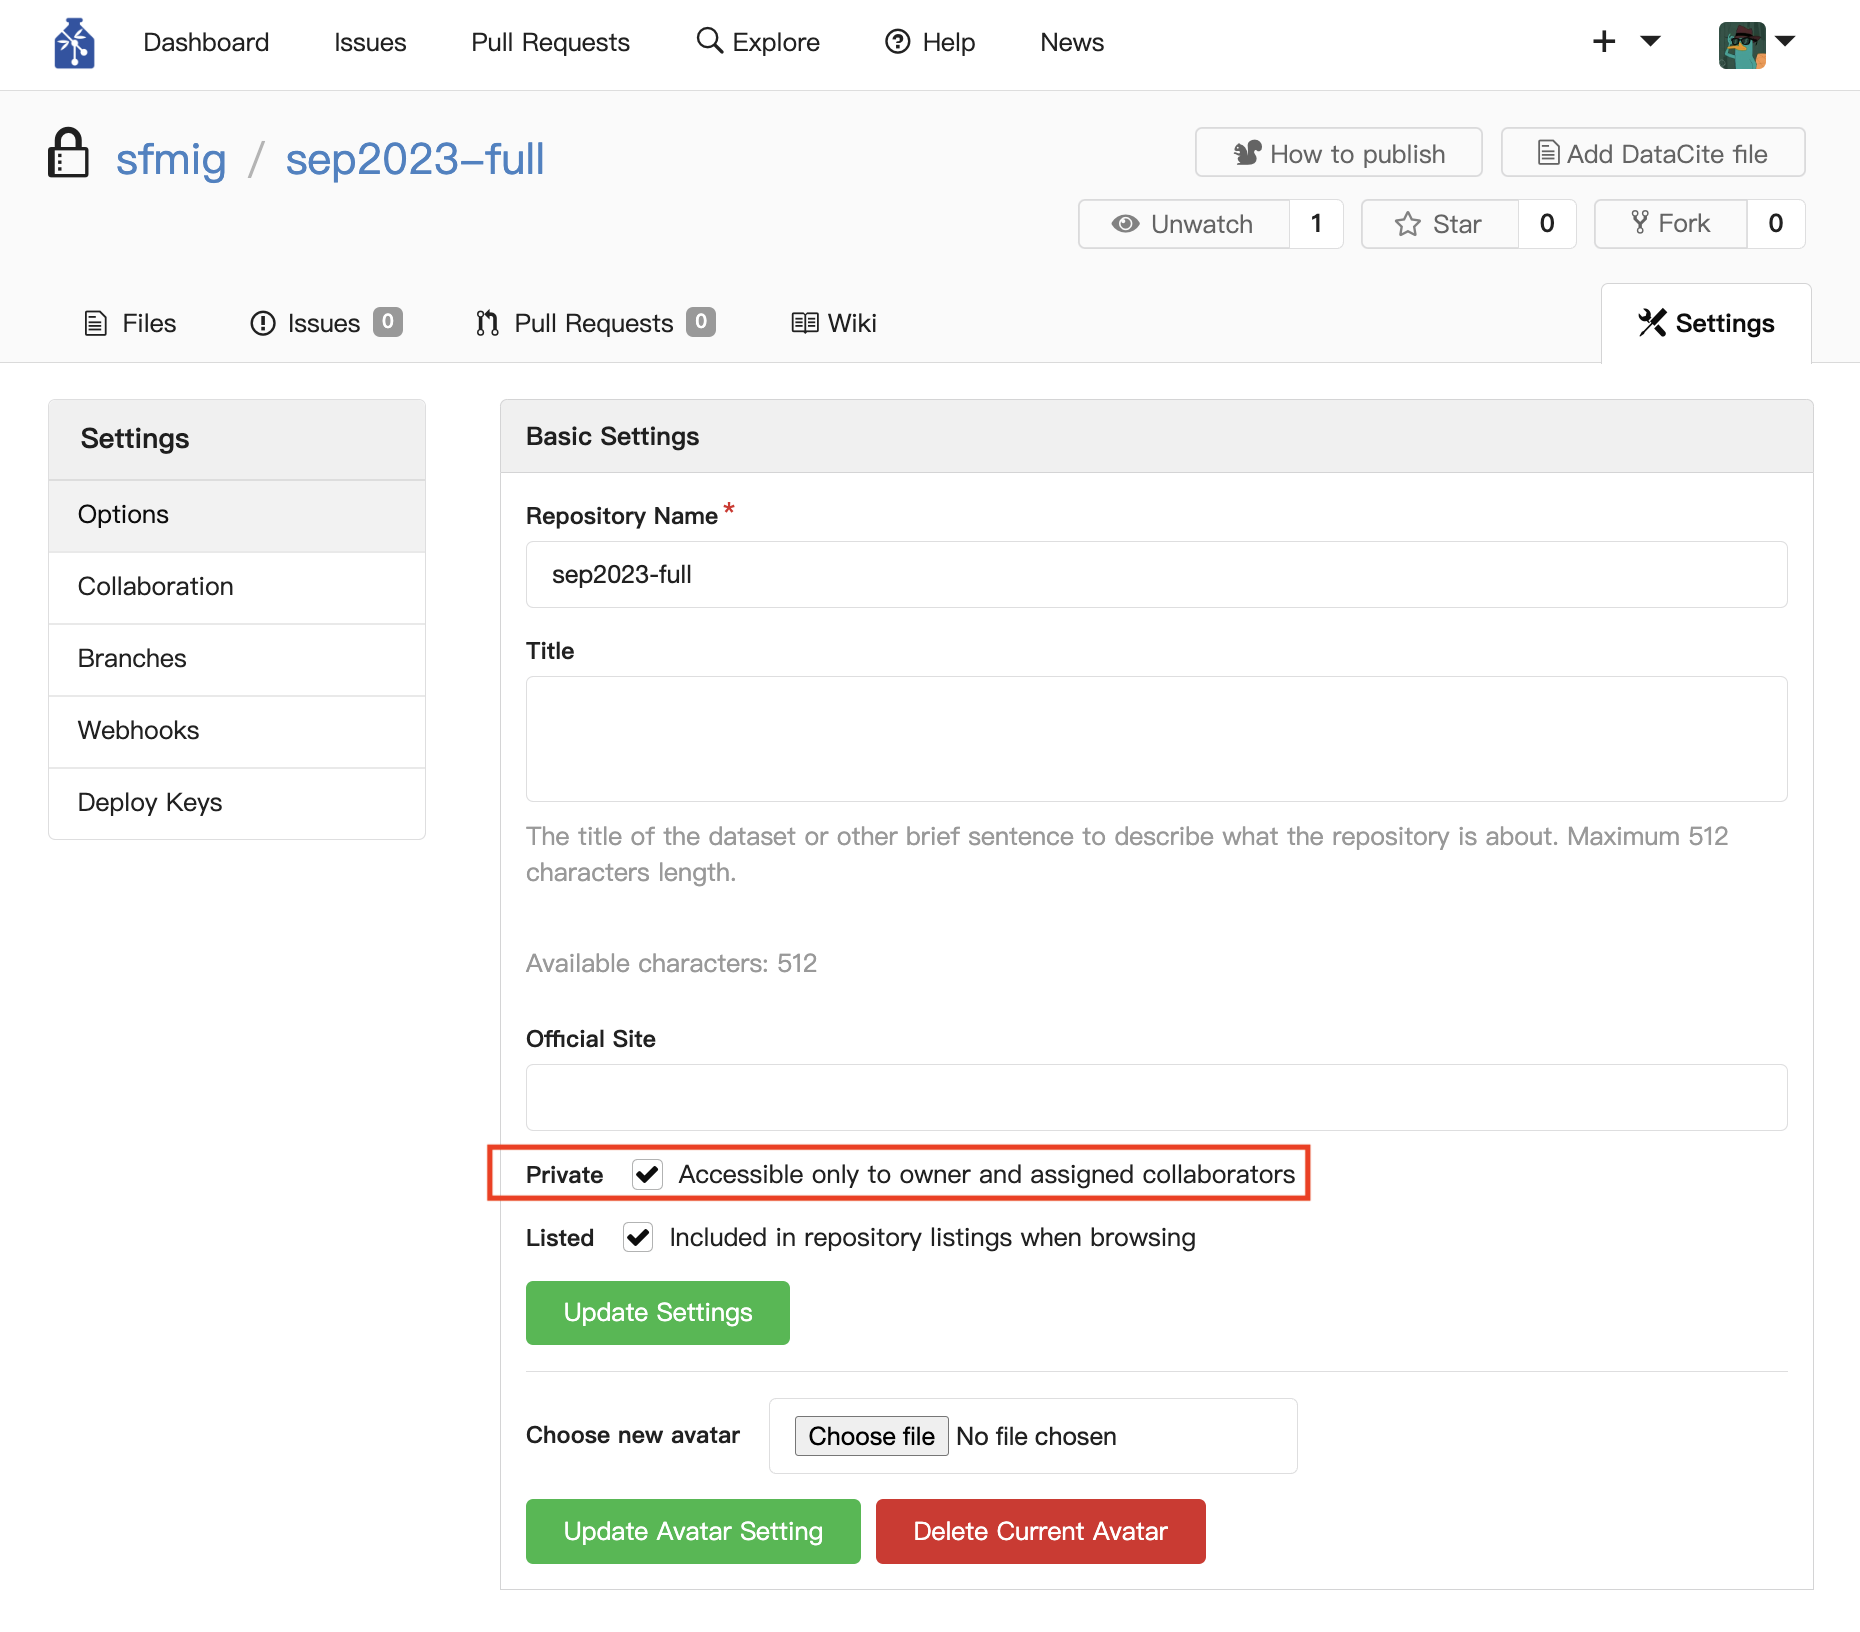
Is this repository public or private?#
By default, all newly-created GIN repos are private.
To make a GIN repository public:
Go to the homepage of the remote repository. You can see the URLs for the repositories you have access to by running
gin repos --all.Click on Settings (top right).
Unselect the Private checkbox under the Basic settings section.
Download a GIN dataset#
To download a dataset from the GIN server to a local machine, follow these steps:
If the repository does not exist locally, clone it from the GIN remote server:
$ gin get <remote-repository-location>
This command will clone to repository to the current working directory, and download the large files in your dataset as lightweight placeholders.
To download the content of the placeholder files, run:
$ gin download --content
If the large files in the dataset are locked, this command will download the content to the git annex subdirectory, and turn the placeholder files in the working directory into symlinks that point to the content.
If the files are unlocked, this command will replace the placeholder files in the working directory with the full-content files and also download the content to the git annex locally.
See the section on File locking for further details.
If the repository already exists locally, we only need to download any changes from the remote. To do this, run from the GIN local repository:
$ gin download
This command will create new files that were added remotely, delete files that were removed, and update files that were changed. By default, new files are added as empty placeholders.
To retrieve the content of all files in the repository, run the download command with the optional
--contentflag. See the GIN docs for further details.
Tip
The content of individual files can be retrieved using:
$ gin get-content <filename>
and removed with:
$ gin remove-content <filename>
Update a GIN dataset#
To update a dataset hosted in GIN:
First clone the repository locally by running:
$ gin get <remote-repository-location>
To see the
<remote-repository-location>s accessible from your GIN account, rungin repos --all.Copy or move the required files to the local repository and log the changes with a commit:
$ gin commit -m <message> <filename>
Upload the committed changes to the GIN server:
$ gin upload <filename>
Tip
To unannex a file, that is, to remove a file from the GIN tracking before uploading:
$ gin git annex unannex [path/filename]
To stop tracking an existing directory as a GIN repository, delete the
.gitdirectory.If in the directory we want to stop tracking the files are locked, remember to unlock them before deleting the
.gitdirectory! Otherwise we may not be able to delete the.git/annexcontent.
File locking#
File locking is an important part of GIN repositories. Below are the main ideas behind this.
Files in a GIN repository can be locked or unlocked. The lock state relates to the nature of the placeholder files we get in the working directory when we clone the remote repository via gin get <remote-repository-location>:
on Unix-like systems (MacOS, Ubuntu):
if a file is locked, its corresponding placeholder file will be a symlink. These symlinks point to the annexed content (under
.git/annex/objects). We can open the files in the working directory (using the symlinks) but we can’t modify them.If a file is unlocked, the placeholder file in the working directory is an ASCII text file with a path. The path is approximately where the content of the file will be downloaded to when we request it.
on Windows:
if a file is locked, the placeholder file is a plain text file with a path pointing to the content in the git annex (but see caution below!).
If a file is unlocked, the behaviour is the same as in Unix-like systems.
The lock state of a file is persistent. This means that if we clone a GIN (remote) repository whose files are unlocked, we lock them in the local copy, and then upload the local repository to the GIN server, the next time someone clones the GIN repository the files they fetch will be locked.
Unlocked files can be edited. If the data is unlocked and the full content of the dataset is downloaded locally, the file in the working directory has content, and so does its copy under git annex.
Caution
Note that if we download the contents of unlocked files locally, the disk usage of the files checked into the repo doubles, because the content exists both in the working directory and under the git annex. But in exchange users can modify and revert files to previous commits.
Caution
We have observed that it is possible to unintentionally overwrite locked files on Windows. Please be careful and double-check the output of gin ls before uploading. You may also want to read about git-annex on Windows if you are considering using git-annex directly.
Locked files cannot be edited. For example, if we open a locked image with Preview in MacOS and try to edit it, we will be asked if we wish to unlock the file. However, even if we do unlock it, we won’t be able to save any changes because we don’t have writing permissions.
Files need to be committed before locking. We can switch the locking state for one or more files with:
$ gin lock <filename>
and
$ gin unlock <filename>
After changing the locking state, remember to record the new state with a gin commit!
Recommendations from the GIN docs on when to lock / unlock data:
Keep files unlocked if the workflow requires editing large files and keeping snapshots of the progress. But keep in mind this will increase storage use with every commit of a file.
Keep files locked if using the repository’s main goal is long term storage as an archive, if files are only to be read, and if the filesystem supports symlinks. This will save extra storage of keeping two copies of the same file.
Download a GIN dataset with Python#
We recommend pooch to programmatically download a dataset from a GIN repository’s URL. pooch is easy to use and has some nice
functionalities like caching the downloaded data, verifying cryptographic hashes or unzipping files upon download.
Here is a simple example of how to download a dataset from a GIN repository using pooch:
import pooch

filepath = pooch.retrieve(
    url="https://gin.g-node.org/<username>/<repository>/raw/main/<file>",
    known_hash=None,
    path="/home/<user>/downloads", # this is where the file will be saved
    progressbar=True,
)
Tip
A common mistake is to use the URL of the GIN repository’s webpage instead of the URL of the raw file.
The URL of the raw file will have /raw/ in its path. For example, the URL of the raw file image.png in the repository my-repo under the user my-user should be https://gin.g-node.org/my-user/my-repo/raw/main/image.png.
The easiest way to get the raw URL of a file is to:
Navigate to the specific file in the GIN repository,
Copy the URL at the search bar of the browser, and
Replace
srcbyrawin the copied URL.
With videos and images, you can often get the raw URL of a file directly by right-clicking on the file in the GIN repository and opening it in a new tab. The URL in the new tab should be the raw URL.
Some under-the-hood details#
GIN is a wrapper around git-annex. The high-level idea behind git-annex is:
gitis designed to track small text files, and doesn’t cope well with large binary files.git-annexbypasses this by using git only to track the names and metadata (hashes) of these large binary files, but not their content.
The content of these large binary files is only retrieved on demand.
Indeed, when we gin download a repository from the GIN server, we get a local “copy” (clone) of the dataset in our machine, but this is not strictly a copy. This is because the large binary files that make up this dataset will only be downloaded as placeholders.
How? Case for an unlocked dataset
If the dataset is unlocked, these placeholder files have the same filenames (and paths) as the corresponding original files, but are instead simply ASCII text files. If we open these placeholder files, we see they contain a path. This path is where the actual content of the corresponding file will be downloaded to, when we request it.
For example, if the placeholder ASCII text file with name
image.pngpoints to this path:/annex/objects/MD5-s15081575--f0a21c00672ab7ed0733951a652d4b49
And when we specifically request for this file’s content with:
gin get-content image.png
the actual png file is downloaded to:
.git/annex/objects/Xq/7G/MD5-s15081575--f0a21c00672ab7ed0733951a652d4b49/MD5-s15081575--f0a21c00672ab7ed0733951a652d4b49
Notice that the path in the ASCII file and the actual path are somewhat different (the actual path contains some additional directories under
objects).We can actually verify this file is the actual image by opening it with an image viewer (e.g. Preview in MacOS):
open -a Preview .git/annex/objects/Xq/7G/MD5-s15081575--f0a21c00672ab7ed0733951a652d4b49/MD5-s15081575--f0a21c00672ab7ed0733951a652d4b49
How? Case for a locked dataset
If the dataset is locked and no content has been downloaded, the symlinks in the working directory will be broken (since there is no data in the git annex to retrieve).
To get the actual content in the git annex, we need to run
gin download --content. This will fetch the content from the GIN server. After this, the symlinks in the working directory should work.
How? Case for a new (or updated) local repository
If we want to create (or update) a GIN repository, we would initialise (or clone) it locally, add files and commit the changes.
When committing, the data is “copied” from the working directory to the git annex. You can verify this by checking the size of the
.gitfolder before and after runninggit commit.When we lock the data with
gin lock <path-to-data>, the files in the working directory are replaced with symlinks to the git annex content.If after locking the data we commit the state change and upload the changes to the GIN server., the files will stay locked for any future retrievals of the repository.
Useful GIN resources#
GIN CLI usage tutorial: includes a description of common workflows.
References#
https://movement.neuroinformatics.dev/community/contributing.html#adding-new-data
https://gin-howto.readthedocs.io/en/latest/gin-repositories.html
On GIN and its relation to
git-annex(very high-level): https://gin.g-node.org/G-Node/Info/wiki/GIN+Advantages+Structure